Knock it down and start again

It took about 5 or 6 weeks before we were secured in the knowledge of having our insurance claim accepted by the insurance company. The whole saga with the insurance company is a long story for another time. It was an extremely stressful situation that took a lot of time and effort to work through. It’s not something I want to relive right now, so instead I’d rather concentrate on what has happened since getting the necessary funding to rebuild our house. To summarise, we had a dispute with the insurer and we successfully won that dispute. I am still insured by that company as I believe that the reason for the dispute was a technicality in their processes and not something sinister or otherwise that would cause me to not consider them for insurance.

A New Opportunity

With this tragic circumstance came a real opportunity to rebuild a house that met my family’s forever changing needs. We’d lived in the old Paddington 29 house for almost 4 years and there were things we absolutely loved about the house and things we wanted to change about it given the chance to build again. The destruction of our home, even though it was terrible and life threatening, presented us with that chance.

We received a cash settlement for our insurance, which allowed us to choose any house we wanted with the money. The only consideration we had to bear in mind was that because the house was under mortgage with the bank, we had to build a house that would be worth as much as the current market value of the old house. Our settlement amount, would prove to be enough to do that but not by as much as we would have thought. Costs of building had increased and market values had fallen since 2015.

Clarendon Homes Again

We had the choice to build the same exact house, but of course with the extra money we now had and new house designs available on the market, we decided on a different house design: the Boston 33 with Grand Alfresco option. This would be a completely new house, with a new design, bigger than the last, and in time it would include a lot more of the features we wanted to change in the old house.

We did consider some other builders on the market, however, in the end our love of Clarendon Homes designs meant that we stayed with them. This proved to be particularly advantageous because they had built our last house so not only did we get a discount for being a repeat customer, they had all the old site surveys and knowledge of the previous build. This kept costs down a little more than if we’d gone with a different builder. It allowed us to make better use of the insurance payout.

Clarendon Homes built us a quality home last time and in all, were a pleasure to deal with. So far, that has been the case this time also, but I’m getting ahead of myself. The first thing that has to happen before you can build a new home when there is an existing structure on the block of land you want to build on is to demolish the structure and clear the site.

Site Demolition

We sourced, or attempted to source, a number of quotes to get our site demolished. We ended up with 3 quotes after asking approximately 6 or 7 didn’t companies to quote. Most came within the same ballpark range as each other, but one stood out from the rest for a number of reasons. Firstly, Site Demolition (this is the actual name of the company) were very responsive to communication and explained everything I asked about. They were easy to deal with and they made it clear what was and wasn’t included. It wasn’t till much later that we found out they are the company that Clarendon Homes actually recommends to clients.

Site demolition came and removed everything on the site and even arranged for an arborist to chop down our trees in the backyard. While doing the demolition, they uncovered some concrete piers that was unexpected and not included in the contract price. They charged me a reasonable rate for the removal and disposal of the concrete. Then they found more on the next day, but generously chose not to charge me for the second load. There were a couple of other unplanned things that happened, but each time was dealt with professionally and reasonably. I had to manage the admin side of this myself.

All in all, we were able to get the site back to the condition it was in when we built on it th first time. I took my boys to see the different stages of demolition as the house was torn down because I wanted them to understand what was going on and put into context where the new house was coming from. I didn’t take Charlie, my 2 year old, until the structure of the house had been completely removed because I felt it might be a little too traumatic for him. You can see in one of the pictures attached to this post, that they were excited and happy to get a new house built.

In my next post, I’ll cover off more detail in our house detail selections: features, colours and design considerations.

Fire! Fire! Fire!

On February 23, 2019 our house was destroyed by a fire. It was difficult to know where to start with this first post after so many years, but that is the fact of the matter and why we are now here again building a new house. We had spent the last 3.5 years living in our home, which we built through Clarendon Homes and in the archives of this blog you can see the journey and decisions we made during that first house building process.

I am writing this post now nearly 8 months after the fire and a lot has happened between then and now. In this post, I will try to summarise as best I can the events that have brought us to this point and then in future posts, I will provide more details on the new build to date and going on until completion.

The Fire

The day started off as a normal Saturday for myself, my wife, father-in-law and two boys (Max 5 and Charlie 2). We went to swimming lessons, then spent time with friends at a local eatery and then back home to relax. Before retiring upstairs to relax, we decided to charge our electric powered moped in the garage. This is a registered vehicle, not some kid’s toy scooter. We have charged it hundreds of times before and have never had any issues or cause to think that we would have any issues.

At approximately 6:30pm a passerby started to bang on our front door and it was only through that random person who just happened to be passing by at the time, that we were made aware of the fire that had been smouldering unnoticed in the garage for who knows how long. My father-in-law, who was downstairs cooking dinner at the time, instinctively opened the internal door to the garage and smoke billowed into the house.

Many people have asked why we didn’t smell the smoke or why didn’t the smoke alarms go off, but the fact of the matter is that the internal door had a weather strip blocking all air, and smoke obviously, from the garage. It wasn’t until that internal door had been opened that all hell broke loose, literally. Obviously, once the smoke entered the house, the smoke alarms started to sound and my father-in-law started to shout out.

To cut a long, and soul destroying, story short I was able to save my boys after making multiple trips in and out of the burning house. By the time the fire brigade showed up, it was too late for them to save anything and the damage their water hoses did, only made it worse. We got out with our lives, but only barely. I’ve attached some photos of the aftermath to this post.

Following on from this we had to fight for our insurance claim to be honoured. And then go through this whole building process again.

A New Choice Of Bricks…

Well, it wasn’t our choice to change the bricks. When we had originally ordered the bricks, they were Austral Everyday Life “Unwind” bricks and we had picked them because they weren’t too dark but had a nice colour to them as well. Not too orange, not too grey, not too light, not too dark.. just the colour we wanted. On top of this, of course, we picked all of our other colours based on the brick colour. Here is what the original brick colour looked like:

AB-Bricks-EverydayLifeUnwindSwatch-NSW

Just after the frames had been finished, we received notification from Clarendon Homes that our brick choice had been discontinued by the supplier, Austral Bricks, and that we would need to choose a new brick. They made the suggestion of Everyday Life “Freedom”, which I was originally uninspired by because they were a lot darker. However, after looking through what else was available, they were the only bricks that were again not too orange, not too grey and so on. They were a lot darker but still within the same kind of colour hue. Here is what the sample picture looks like:

AB-Bricks-EverydayLifeFreedomSwatch-NSW

So of course this meant that all of our other colour selections had to be re-evaluated. Fortunately, all but one of the colours holds up with the new brick colour. All except for the cladding colour, which if you look back at the colour selections post, was a dark kind of brown colour with a hint of khaki. Even though I think it would have worked with the previous brick colour, I was never really 100% happy with the colour but was just going to wait and see. Our cladding will be on the 1st floor on both left and right sides of the house but not at the front and not all the way down the sides. This means that it will be very visible from most angles and quite prominent also.

After some consideration, I emailed Clarendon Homes to see about changing the colour without paying an administration fee. On account of us not having a choice in the brick colour change, they were happy to change the colour, which we have now chosen to the be same colour as our garage door. The garage door and some of our other external metal bits and pieces are in paperbark colour. So this actually worked out quite well in the end.

Today, we visited the site and were able to see the first course of bricks had been laid. The white stuff on top of the bricks is the termite protection layer. In any case, you can see what the colour of the bricks will be and compare with the stone beige colour of our windows. Paperbark is actually a little more yellow-ish than the stone beige but it’s similar.

Cj3KgZT

Furniture Selection Idea

So, the build is well underway, and now we start to think about what we are going to furnish our new house with. We currently live in a 2-bedroom apartment and we are going to be moving into a 5-bedroom house with 2 living rooms plus an alfresco area, so there is a lot of extra rooms and space that we need to fill with even some basic furnishings so that the house doesn’t look half empty!

Our first port of call is IKEA. IKEA have come a long way since they first appearance in Australia. In any case, we are just looking at this stage and IKEA is only the first shop to look at and we would rather find sales at other places based on the ideas that we are putting together here but then again, if we can find something decent at IKEA, we won’t say no to it either.

For the main living area downstairs, we want to show off our leather lounge, so that will be going there:

Quay 2.5 + Chaise (Bay Leather Republic)

Quay 2.5 + Chaise (Bay Leather Republic)


We do actually have a dining table and chairs already but with a new house, we want an updated table. The one we have now is old and used and only a 4 seater. So we’re going for something a little more contemporary looking with some comfortable chairs. This particular table is one of those extendable types: The table itself is probably something we’ll get from IKEA but possibly look elsewhere for the chairs.

STORNAS with Chairs (IKEA)
STORNAS Extendable Table (IKEA)


We’ll have to wait till we move in to see if bar chairs will be something worth getting but the ones I like match the dining chairs:

HERIKSDAL Bar Stool (IKEA)


Next up is the Study area where we want to try and set up a reading area with REAL books. The room is situated at the front of the house, kind of separated from the other rooms, so we are going to try and make it a little retreat area to sit comfortably read, drink a cup of tea/coffee etc The bookcase is something we’ll likely get from IKEA rather than just being an idea.

BILLY Corner Bookcase (IKEA)


VEJMON Round Coffee Table (IKEA)


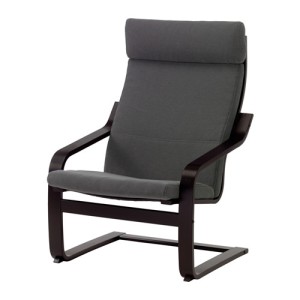
POANG Armchair (IKEA)


Now for the outdoor alfresco area. We are going to also have a paved area but the alfresco area is like the study area except outside. It’s kind of a small area so we can fit a lot there without it becoming crowded. We really like the IKEA outdoor stuff, so will likely get it from IKEA. There are two possible solutions here, both with their own matching coffee table. The first is the rattan style and the second a stained wood:

ARHOLMA 3+1 (IKEA)
ARHOLMA 3+1 (IKEA)
ARHOLMA Table (IKEA)


ÄPPLARÖ 3+1 (IKEA)
ÄPPLARÖ 3+1 (IKEA)
APPLARO Table (IKEA)


As I said at the beginning, this is all purely initial ideas at this stage and we still have months to go before we need to decide. We’re also not looking to get everything at the same time either. We will just get what we need for the house to look good and worry about the extra rooms and spaces as well go, adding decorations, artwork and so on as we go.


Slab done, frames started

Sorry it’s been a while since I last posted. My intention was to make a note of every new development as it happened so not only would there be a record of things as they happened but also an approximate timeline for others to see what timeframe the build takes etc.

In any case, since the last post we had holes dug to be filled with concrete that create the piers to support the slab. Once that was done, we had the actual slab pour. The slab in my opinion, based on others I’d seen in the past was good quality workmanship. Not the best of the best but certainly good clean edges and to a degree of quality I was happy with.

My son thought that the plumbing pipes made good drums! 🙂

After that of course there was  a delay while the slab cured and also there was the first progress payment to organise from the bank. Without the payment nothing would move forward. There was a bit of fiddling around with that but only because of the public holidays that happened at the same time.

With the payment made our frames were delivered within a couple of days. Then of course we started to get rain in Sydney. At first it was just a little rain followed by a nice day and then more rain the next. The problem was that they were marking the slab for the positioning of the frame and then the rain came and washed it off again. Then of course we have had torrential rain in Sydney over the last few days, you would have seen it on the news.

Finally today we have progressed to the frames going up. Well at least partially. It’s a two storey home, so the site supervisor estimated the time to properly finish framing would be 6 days.

CDC Approved, PCVs Signed…

So our CDC plan submissions have been approved and just today I’ve completed signing off on my last Post-Contract Variations (PCV). In the end, after certification was done and Clarendon Homes removed unnecessary items, we actually ended up being credited around $5,000 from the original tender amount. With around $4,500 of additions we made to the house, that actually puts us in a positive position of around $500.

At the time I found that out I was a little disappointed that we had $5,000 to spare and we could have used it for upgrades, like increasing the height of the ceiling to 2750mm for example. However, after a while I decided that it’s good actually because we are getting what we wanted (more than we need!) and we have $5,000 extra to spend for landscaping. We still have yet to receive a quote on landscaping but with the extra couple of retaining walls we are required to install, it’s likely that extra $5,000 will be swallowed up in that.

Hopefully sometime this week will see the final drawings and then we (well me really) can spend several days pouring over the plans, cross-checking it against all the various bits of paper we have to ensure everything is included.

Landscape Plan

Really quick post this time, just wanted to show off our landscape plan. Essentially we want a basic garden landscape with some planting around the perimeter of the lot, some grass in the back and front yards and not much else. We do want to kind of extend the hard surface area from our alfresco with some paving or stencilled concrete too with a path leading from the laundry door around to the alfresco area but that’s all.

The idea will be to plant some dwarf fruit trees as well as try to fit in a few planter boxes for a small vegetable garden too. We’re thinking maybe 2 or 3 raised garden beds along the back fence. The only other “feature”, if you can call it that, is to have a nice outlook from the kitchen window by planting some grassy/leafy bushes outside between the fence and the kitchen window.

Landscape Rough Plan v2

House Plans

So I’ve written all this stuff but forgot all about what the actual plans look like. These are not the final drawings but they are the latest we have access to. The main changes we made to the Paddington 31 that is on display in Parklea is that we chose not to include the rumpus room at the back of the ground floor, making our house into a Paddington 29. Then we also opted to upgrade the powder room to include a shower so that it became a 3rd bathroom.

Other additions that won’t be shown on these plans are things like under stair storage, downlights in the kitchen over the preparation area and little things like that. One change we did make that is on the plans is the upgrade to a spa bath. Anyway, here are the plans:

Ground Floor Plans
Ground Floor Plans – Click for Larger Image
First Floor Plans - Click For Larger Image
First Floor Plans – Click For Larger Image

Tile Selection

One of the many things we needed to do during the early stages of the building project was to select our colours, fittings and everything that is going inside the house. I’ve already covered the colour selection but that didn’t include the tiles selections for the laundry, bathrooms and other areas of the house that will be tiled.

For the entry, hallway, walk-in pantry, kitchen, meals, and linen areas, which essentially covers 90% of the ground floor, we’ve selected a 450mm x 450mm tile that has a milky white marble effect to it. The other areas on the ground floor are the garage, which will obviously just be cement, and the front room, which will be carpeted.

Tempo Milk Gloss 450x450
Tempo Milk Gloss 450×450

Still on the ground floor, the external porch (front) and alfresco (back) and sills (I assume windows?) will have a 450×450 tile as well but will be a mottled grey colour. The picture I have from Tiles Direct is for a different size tile but it is still representative of the colour and appearance.

Minima Castor 450x450
Minima Castor 450×450

In the kitchen for the splash-back, we really wanted to have the glass tile sheets as seen in the display home, however it is ridiculously expensive so we had to pick something a little cheaper. I forget the actual amount they wanted extra but it was in the thousands! Essentially, we went with a small 100×300 ivory coloured tile that will be set horizontally. I am definitely happy with our selection on this one as it will bring out the surrounding colours of the benches and cabinets as well as not taking away from the window we have over the bench.

Lantic Ivory Gloss 100x300
Lantic Ivory Gloss 100×300

For the laundry we had to choose the skirting section, which we basically just tried to match up with the floor. It’s not the exact same one as the floor but I don’t have a picture of it. The name is Laguna Wenge 300×300. We used this same tile for the skirting in both the main bathroom and the powder room bathroom. The same tile selection was made for both the main bathroom and the powder room bathroom to keep the styles similar. We did something different for the ensuite to set it apart but I’ll get to that in a moment. We’ve kept it pretty simple in the bathrooms, with just Stock Gloss White 300×600 for the floors and walls and the Laguna Wenge for the skirting.

Stock Gloss White 300x600
Stock Gloss White 300×600

For the feature strip tile, we kept to the neutral look with the Manika Mosaic Charcoal.

Manika Mosaic Charcoal

Lastly, the ensuite. We didn’t go crazy with expensive tiles of course but we did want it to be different to all the other bathrooms in the house. We added a bit of colour to the feature strip without it being an eye-sore and picked tiles that would compliment the feature strip as well. On the floor we went with a 300×300 square tile in a charcoal colour that kind of has a shale appearance and not too glossy. It has a bit of sheen but not gloss.

Matang Charcoal 300x300
Matang Charcoal 300×300

For the walls, we went with the same colour but in a longer (300×400) and glossy tile.

Matang Charcoal 300x400
Matang Charcoal 300×400

Finally, the feature tile strip, which can be seen on the side of this other tile:

Agra Grey Mosaic
Agra Grey Mosaic